The other option is to add snaps instead of Velcro. The Velcro was very easy to sew on-make sure you don’t get the sticky backed kind, it will cause your needle to dull and sticky and give you nothing but trouble.

February 16, 2024
AccuQuilt Cutting - The Bib Die

February 16, 2024
AccuQuilt Cutting - The Bib Die
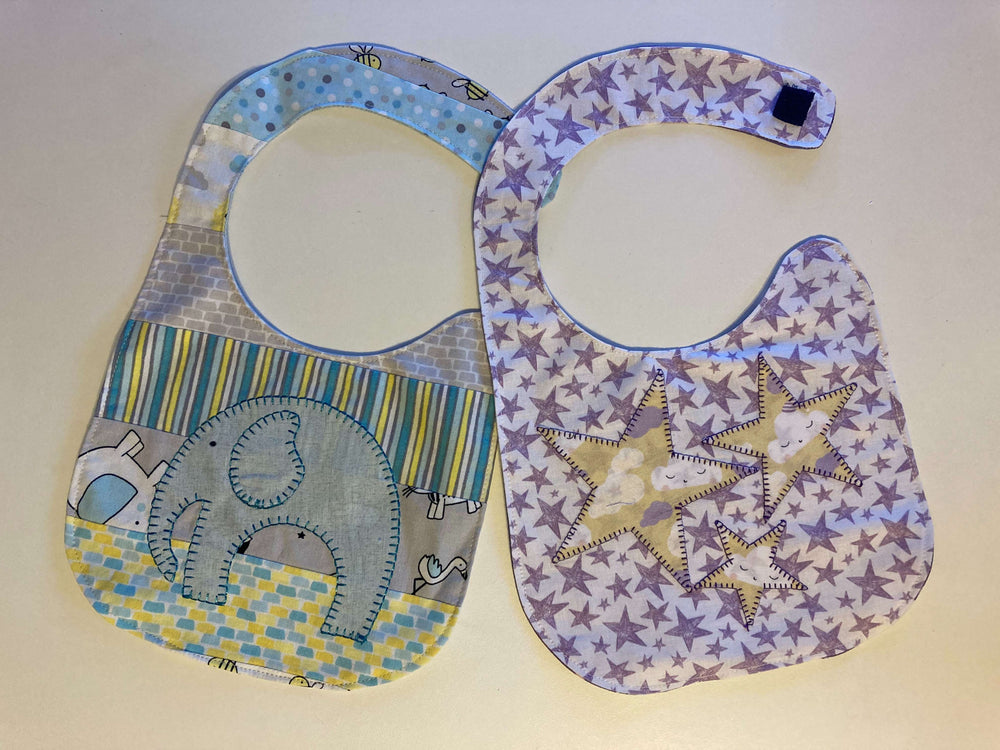
The Accuquilt cutting system is not only for accurate block cutting, but also for cutting out appliques, shapes, AND other sewing projects! One of my favorites, for an easy, personalized gift, is the Bib die. You can easily make a custom bib for that special baby in your life. With a multitude of applique dies, you can be assured that you will find the perfect pair that will be cut to perfection. Join me in my Accuquilt journey as I show you how easy the Bib Die is. I complimented my bibs with the Star applique die and the elephant applique die.

Here's What You'll Need:
Accuquilt cutter (GO! Big #55500 or GO! #55700)
Bib Die (#55864) and mat
Star Die (#55028) and mat
1/4 yard main fabric
1/4 yard back fabric
1/8 yard or fat quarter for Stars
Steam a Seam for Star appliques and piece of stabilizer
Small piece of velco
Sewing machine that has an applique stitch, with fresh Microtex 80/12 needle
Cotton or polyester thread
Applique foot
Iron, ironing board and Mary Ellen’s Best Press

Accuquilt GO! Fabric Cutter

Accuquilt GO Bib Die


Cut the Steam a Seam to the size of your desired applique.
Lightly press the back of your applique fabric, removing the paper to expose the sticky side.
The GO! Cutting system will allow you to cut 6 layers at a time.
Run the Star die with the appropriate size mat through the cutter. Set your Stars aside.

Prepare the front and back of your fabric. Using your Best Press, spray the fabric and iron. You will need roughly a 9”x14” piece of fabric for the main and back of your fabric. With right sides together, lay the fabric on the die covering the light grey outline of the bib. Run the die through your cutter.


After you have your two pieces cut, take the paper off the back of your stars and place on your main piece of fabric. Iron the stars down. Place a piece of stabilizer behind the main piece of fabric where the stars are located and applique around the stars. I used a standard blanket stitch, but get creative! An open toe applique foot helps with visibility and accurate stitching.
Accuquilt also offers embroidery files for some of their applique dies. Definitely check that out on their website for an easier, in the hoop applique option. If your applique stitching starts to pucker or tunnel, place another piece of stabilizer under your main piece of fabric where the applique is. After you are done stitching, tear away the stabilizer as much as possible.


Sew the Velcro in the appropriate places:
One on the top of the main fabric near the neck wrap around,
and the other one on the backing fabric where it would lay on the baby’s shoulder or collarbone.

After your Velcro (or snaps) are attached, place the bib right side together and stitch with an 1/8” all around, leaving an opening that is about 1-1 ½” to pull the bib through. I used a Fast Turn tube turner to grab the corner of the neck strap and pull through the opening at the bottom. After you turn your bib right side out, iron the opening so that the seam will be easy to topstitch. Topstitch all around the bib, making sure you stitch the opening closed.
The possibilities are endless with all the applique options! I pieced 2 ½” strips together to create the background for the elephant bib. Sew cute!


Shop AccuQuilt
The number one thing quilters all want is more time and using a fabric cutter is up to 90% faster than rotary cutting.


